Wednesday 30 December 2009

Butter bean hummus

Smooth, dreamy hummus with my favourite member of the bean family


I love hummus. This is a long-standing fact. I now also love butter beans. I felt I needed to combine these two loves to create a Super Hummus, one capable of destroying nuclear-powered bad guys and keeping the world in balance. I soon found that this was not in the slighest bit possible. However, I did find that butter bean hummus is delicious. It won't keep your house safe from burglars or pillagers, but it will keep your belly full of niceness.

Ingredients:
- 1 tin of butter beans, drained and rinsed
- 1 tablespoon of tahini
- 2 or 3 cloves of garlic (to your taste)
- Juice of half a lemon
- A few tablespoons of good quality olive oil
- Fresh parsley, chopped
- Salt, pepper

Method:
- Chuck the butter beans in a food processor with the tahini, garlic and lemon juice and blitz.
- Add a good pinch of salt and pepper and about 2 tablespoons of olive oil. Blitz again until the mixture is thick and smooth.
- Taste it for seasoning; add more salt if it's needed. Stir in some fresh parsley.
- Sprinkle a little paprika on the top, garnish with a sprig of parsley and serve with some toasted pita breads and sliced raw vegetables.

Tuesday 29 December 2009

Chicken liver pate

Rich, mouth-watering pate which only gets better with time


This was also made for our starter on Christmas day. We had quite an assortment of different breads and chutneys and this pate fitting in perfectly. I was inspired to make this by the rather brilliant Lola-Lu's Kitchen, which is run by my friends Lucy and Rayne, both of whom are a dab hand in the kitchen (to put it mildly). I'd never made a pate before and had always assumed it must be difficult, as it tastes so damn good. However it was really easy and fairly quick, the only unpleasant part is preparing the raw livers at the start. I drafted in some help for that bit!

Ingredients:
- 6.5 oz butter
- 1 onion or a couple of shallots, chopped
- 2 cloves garlic, crushed
- 1 lb chicken livers
- Zest of 1 orange
- 2 tbsp fresh orange juice
- 2 tbsp brandy

Method:
- Heat half of the butter in a frying pan over a medium heat, and cook the onion genty until soft; it takes about 8 minutes. Add the garlic for 1 minutes and then transfer the whole lot to a food processor.
- Now, to the livers. You need to check the livers for any sinewy bits or gristley bits and remove them with a knife. This isn't a nice job but it's worth it in the end so keep that in mind.
- Add the livers to the frying pan with the orange zest and cook for a couple of minutes until browned.
- Add the brandy and orange juice for 1 minute, then put all of this into the food processor with the onions and garlic. Add the rest of the butter and process really well until it is as smooth as possible.
- Scrape into a nice serving dish and place it in the fridge after it has cooled. It will be quite runny when just cooked, but it will set quite quickly in the fridge.
- This is good to eat for about 3 days, and in fact it tastes better as the days go on. Ridiculously delicious stuff, this.

Cranberry muffins

A sweet start to Christmas day


My father makes these every year at Christmas, and they get devoured with big steaming cups of tea and small glasses of sweet sherry. They are a great way to take the edge off the hunger while you're cooking the Christmas dinner.

Ingredients:
- 6 oz fresh cranberries
- 2 oz icing sugar
- 5 oz wholemeal flour
- 5 oz plain white flour
- 1 tbsp baking powder
- 1 tsp mixed spice
- Half tsp salt
- 2 oz soft brown sugar
- 1 egg
- 8 fluid oz milk
- 2 fluid oz vegetable oil

Method:
- The first thing you need to do is cut all the cranberries in half (this part is a bit laborious, stick on some music and you'll manage) and place them in a bowl with the icing sugar. If you have time to do this part the night before, that's preferable. Mix the icing sugar and cranberries together and leave to rest, if not overnight then for about an hour.
- Heat the oven to 180 degrees and grease some muffin tins well.
- Sift together the white flour, wholemeal flour, baking powder, mixed spice, salt and brown sugar and mix well.
- Make a well in the centre. Beat the egg with the milk and oil and add to the dry ingredients. Stir until just blended but try not to over-mix it.
- Gently stir in the cranberries.
- Fill the muffin trays with the mixture, getting each muffin about two-thirds to the top.
- Bake in the oven for approx 20 minutes until the muffins are risen and turning golden. Turn out onto a wire rack and leave to cool.

a

Goats cheese & potato bread

Bread and cheese, a happy marriage indeed


I cooked this as part of our Christmas dinner starter and it went down a treat. It's a dense, heavy bread that is bursting with flavour. It looks fancy but, as usual, it's easy to make.

Ingredients:
- 4 oz goats cheese
- 4 spring onions, finely chopped
- 1 medium potato (approx 6oz)
- 1 teaspoon fresh thyme
- 6 oz self-raising flour
- 1 tsp salt
- Pinch of cayenne pepper or chilli powder
- 1 egg, beaten
- 2 tablespoons milk
- 1 generous tsp wholegrain mustard

Method:
- Preheat the oven to 180 degrees and grease a baking tray.
- Sift the flour, salt and cayenne pepper into a bowl.
- Peel the potato and grate it into the bowl.
- Add in the chopped spring onions and fresh thyme.
- Chop the goats cheese into 1cm cubes and add two-thirds of this to the mixture.
- Mix everything together gently with a metal spoon.
- Add the milk and mustard to the beaten egg, and pour this into the flour mixture. Bring it together into a loose, sticky dough using the metal spoon.
- Place the dough on the baking sheet and shape it into a rough 6 inch round.
- Gently press the remaining goats cheese into the top of the bread and dust with about half a handful of flour. Scatter over a few more thyme leaves if you have them. It should look something like this:


- Bake in the oven for approx 40 minutes until it is golden brown and sounds hollow when rapped on the underside.
- Leave to cool on a wire rack. Use within 2 days.

Feta and tomato quiche

Light on the belly and easy on the eye


After a rather epic Christmas, I was absolutely sick of rich foods, and really just wanted a nice simple dinner which wouldn't leave me feeling enormous and incapacitated. My lovely wonderful friend Kate was coming over for dinner so I wanted something delicious but not heavy. Quiche was the winning solution. To me, making a quiche is a healthier version of a pizza, as you can pick whatever toppings you like and lash them all in there. I had a serious craving for feta cheese, and couldn't face the prospect of any more meat, so this is a veggie option. If you want to add in meat, try some smoked bacon or cooked chicken.

Ingredients:

For the pastry:
6 oz flour
3 oz margarine
Herbes de provence
Water

For the filling:
4 or 5 eggs
Splash milk
1 onion, diced
A few tomatoes, sliced
A handful of mushrooms, sliced
Half a block of nice crumbley feta

Method:

- Preheat to the oven to 180 degrees and grease your flan tin well.
- Put the flour and margarine into a food processor and blend. Add in a good teaspoon of herbes de provence (or any herbs you like really) and mix.
- With the food processor switched on, slowly add in cold water until the mixture comes together to form a dough.
- Chuck some flour on your countertop and turn out the dough. Flour your hands and knead it lightly.
- Roll out the dough, pick it up carefully and place it into the flan dish. Press it into the edges, and using a fork, prick a few holes in the base.
- Cover the pastry with some tinfoil or greaseproof paper and weigh it down with some rices or dry beans. Bake it like this in the oven for 10 minutes.
- After 10 minutes, remove from the oven and discard the foil and beans/rice. Brush the top of the hot pastry with a thin layer of beaten egg and return to the oven for 1 minute. This will create a seal to stop your pastry going soggy when you add the filling.
- Remove from the oven and scatter over the chopped onion, mushrooms and tomatoes. Top with the feta, which you can either crumble over (as I did) or chop into small blocks.
- In a small bowl, beat together the eggs with a splash of milk and some salt and pepper. Pour this into the flan dish.
- Place in the oven for 20 - 25 minutes until turning golden and cooked all the way through.
- Serve with either a mixed salad or some homemade chips.

Monday 21 December 2009

Oat & banana flapjacks

Sweet, sticky, crunchy coffee time snacks


I was craving something sweet today, but didn't want to start splurging on chocolate and cakes as it's quite not Christmas yet. I opted to bake these flapjacks instead of gorging on store-bought junk, and they really hit the spot. The dark brown sugar and the banana are perfect together, and this is definitely the best flapjack recipe I've ever used.

Ingredients:
2.5 oz brown sugar
1.5 oz butter
2 oz marg
8 oz oats
1 banana
3 tbsp honey

Method:
- Chop up the butter and margarine and put them in a big bowl. Whack this in the microwave on high until they are almost melted. Remove from the microwave and mix well until completely liquid.
- Add the sugar and honey and mix well.
- Stir in the oats. Don't worry if it seems a bit dry at this point as the banana will add wetness.
- Mash up the banana really well and add it to the mixture.
- Tip the mixture into a well-greased baking tray and pack it down quite well.
- Bake in a moderate oven (180 for a fan oven) for 15 minutes. If you like your flapjacks really hard and crunchy, cook them for another 5 minutes. I like them to be crunchy yet also slightly chewy and sticky; 15 minutes for this is perfect, until they are just starting to turn golden brown on top.
- Remove from the oven and cut with a knife while they are still warm; it's much easier to do it before they have cooled.

Sunday 6 December 2009

Chocolate orange cake

Moist citrus sponge with lovely dark chocolate chunks


It was my niece's birthday recently, and she couldn't celebrate properly as she was suffering a nasty bout of flu. I thought she definitely deserved a decadent treat, and what better way to say 'sorry your birthday was shit' than to bring her a lovely big delicious cake? I used a sort of bundt-style cake tin for this, but you could also just split the batter between two circular sponge tins and then sandwich them together with some cream or ganache to make a more conventional two-tiered cake.

Ingredients:
- 8 oz butter
- 7 oz sugar
- 5 eggs
- zest of 3 oranges
- 7.5 oz flour
- 1/2 tsp baking powder
- 1/2 tsp bread soda
- 125 ml freshly squeezed orange juice
- 6 fluid oz buttermilk
- 2 tsp vanilla extract (not essence)
- Bar of dark chocolate, preferably 70% cocoa

For the syrup:
- 250 ml orange juice
- 1.5 oz sugar

Method:
- Using an electric beater (you really need one for this recipe, unless you have the patience of a saint and the arm muscles of a professional lifter man... that's a profession, right?), cream together the butter and sugar in a bowl until it is pale in colour (about 5 minutes). Add the eggs, one at the time, and chuck in the orange zest. If it looks a bit curdled, don't worry, it won't last.
- In a bowl, sieve together the flour, baking powder and bread soda.
- In another bowl, mix together the orange juice, buttermilk and vanilla extract.
- Turn on the electric beater again and add 1/3 of the flour mixture into the creamed butter, then add 1/2 the buttermilk mixture. Still mixing all the time, add half of the remaining flour, then all of the buttermilk, then the remainder of the flour.
- Chop up the chocolate into rough chunks and coat them in a handful of flour; this is to stop them all sinking to the bottom of the cake as it bakes.
- Turn off the electric beater and fold in the chocolate chunks with a spatula.
- Pour the batter (it will be quite wet for a sponge batter) into a well-greased tin (or two tins, if using round cake tins) and smooth the top with the spatula.
- Bake in a low-moderate oven (160 celcius for a fan oven) for 30 - 35 minutes until the top of the cake is slightly springy and a skewer comes out clean.
- Let it cool for a few minutes while you prepare the syrup.
- In a small saucepan, combine the sugar and orange juice and heat gently until the sugar melts and is completely dissolved.
- Turn out the cake from the tin (gently!) and slowly spoon the syrup over the cake while it is still warm. The syrup will be absorbed by the sponge to give the most incredibly moist and melty sponge.
- Leave to cool entirely and serve with a glass of wine or a nice coffee.


Saturday 5 December 2009

Sticky barbeque spare ribs

Like having a really good take-away that you happened to have cooked yourself.


Martin got me a lovely new cookbook for my birthday this year; Mrs. Beeton's Easy Entertaining. I was keen to get cracking on trying out some recipes, so I had a go at making these ribs for my sister and her family. They turned out incredibly good; really sticky and sweet and slightly sour all at once. I will definitely be making these again. They take a while to make, but are not very labour intensive so you can relax and have a glass of wine while they cook away in the oven. The spice mixture and sauce quantities in this recipe will be enough for about 8 ribs - double both quantities if you're making more than this to make sure you have enough.

Ingredients:

- Pork spare ribs - 2 per person if they are big juicy ribs from the butcher

For the spice mixture:
- 6 tbsp soft light brown sugar
- 1 tbsp grated lemon rind
- 1 tbsp paprika
- Salt and pepper

For the barbeque sauce:
- 7 fluid oz tomato juice
- 3 tbsp tomato ketchup
- 2 tbsp worcestershire sauce
- 2 tbsp soft light brown sugar
- 1/2 tbsp wholegrain mustard
- 1 fresh red chilli, as finely choppped as you can manage

Method:

- Heat the oven to about 160 degrees celcius.
- Cut the ribs into individual portions (you can get the butcher to do this for you) and place them in a baking dish in a single layer.
- Mix together all the ingredients for the spice mixture and rub into the ribs.
- Meanwhile, make the barbeque sauce. Put all the ingredients in a saucepan and add about 3 or 4 fluid oz water. Bring to the boil and simmer for about 15 minutes until it starts to thicken.
- Pour the sauce over the ribs, coating them evenly, and put them in the oven.
- After 30 minutes, remove them from the oven and turn the heat up to 180. You will see that the barbeque sauce has thinned as the fat has melted out of the ribs. Pour the sauce carefully into a saucepan and return the ribs to the oven.
- Boil the sauce like mad for about five minutes, then turn it down and let it simmer until it turns into a nice sticky sauce.
- Get the ribs out of the oven again and dab the sticky sauce over the top of them.
- At this point you have two options: either put the oven up on full blast and put the ribs back in for 10 - 15 minutes until they start to char nicely, or put them until a hot grill for the same effect. Grilling would be preferable but we did them in the oven and it worked out fine.
- Remove from oven and serve immediately.
- We served with a nice big pile of homemade chips, which were made very thusly: chop up some peeled white potatoes to the thickness/ size of your choosing (I like a fat chip, me) and toss the chips in a healthy glug of olive oil and paprika until they are all coated and glistening. The chips will take 30 - 40 minutes in a hot oven (about 190 or 200), depending on their thickness.

Tuesday 24 November 2009

Chocolate brownies

Heavy, rich, velvety chocolate brownies for a wicked indulgence


Sorry for the rubbish photo, my camera is in a sulk today. Anyway, these brownies are fantastic. They are so good that I made two batches in two days due to demand. They take about 5 minutes to prepare and 15 minutes to bake so they are officially the quickest thing I have ever baked from start to finish. My brother also assures me that they are the tastiest thing I have ever baked. Double win!

Ingredients:

5 oz margarine
2 eggs
8 oz caster sugar
3.5 oz flour
2 oz cocoa powder
1 tsp vanilla extract
2 heaped tsp instant coffee

Method:

Chop up the margarine, chuck it in a big bowl and put it in the microwave until it melts. Once it's all smooth and liquid, mix in the cocoa powder, and then the sugar.

Dissolve the coffee in a tiny bit of hot water (just enough water so that the granules dissolve properly) and add this to the mix along with the vanilla extract. Add the eggs, one at the time, then mix in the flour.

Pour into a baking tin and bake at 160 celcius (fan oven) for approximately 15 minutes. The cooking time will vary according to your oven and also how thick your brownies are by virtue of your baking tin. There are really 3 ways to check if they are done (and these rules apply to all baked sponges really). Firstly, put a skewer into the centre of the brownies - if it comes out gooey, they're not done yet. If it comes out almost clean, they are done. Second, touch the top of the brownies with your finger; if the sponge springs back until your touch, it's cooked. Finally, look at the edges of the sponge - if it's starting to pull away from the sides of the baking tray, it's ready to come out of the oven.

Leave to cool, cut into squares, and distribute amongst people whom you wish to impress.

Monday 16 November 2009

Raspberry and white chocolate trifle

Sweet boozey birthday trifle, personalised with crushed chocolate lettering.


Ingredients:

For the sponge:
- 3 eggs
- 3oz caster sugar
- 3 oz plain flour, sieved

For the custard:
- 1 pint full-fat milk
- 55ml cream
- 1 tsp vanilla extract
- 4 egg yolks
- 1oz caster sugar
- 2 level tsp cornflour
- 1 big bar of white chocolate, chopped

- 1 packet of fresh raspberries
- Raspberry jam
- Bristol cream sherry
- Whipped cream

Method:
- To make the sponge, preheat the oven to 160 degrees celcius (that's for a fan oven - try 180 if using a conventional oven).
- Whisk the egg yolks and sugar together with an electric beater until thick and pale. Fold in the flour gently using a metal spoon.
- Pour into a greased baking tin and bake for 10 - 15 minutes; it is cooked when it is golden and springy to the touch.
- When the sponge has cooled completely, cut it in half through the middle. Place one half in the bottom of your trifle bowl and douse liberally with sherry. Spread the other piece of sponge thickly with raspberry jam, and place it in the dish on top of the previous layer. Again, douse with sherry.
- Place the fresh raspberries on top of the sponge, evenly spacing them.
- Next order of business is to make the custard. You can absolutely cheat and use custard from a packet if you want to; the trifle will still taste amazing, but if you have the time and the gumption it is a real treat to have homemade custard.
- Pour the milk and cream into a saucepan, add the vanilla extract, and bring to a simmer slowly over a low heat.
- Meanwhile, mix together the egg yolks, sugar and conflour with an electric beater until really well blended.
- Pour the milk and cream mixture into the eggs and sugar. Be sure to whisk nonstop at this stage.
- Pour the mixture back into the saucepan and stir it gently over a low heat until it thickens. Add the white chocolate and stir until melted.
- Spoon the custard evenly over the raspberries and sponge and allow to cool.
- Finally, spoon a layer of whipped cream on top of the custard and the trifle is complete.
- We served with some sweet dessert wine, and as you can see the trifle didn't last too long:


Afterwards, a bit of a catnap was in order. See what I did there? Catnap? I'll get my coat.

sp

Cannelloni

Spinach and ricotta for the vegetarians; chicken, leek & mushroom for the meat eaters.


This was our main course for the dinner party. It was a brilliant choice because it could be prepared in advance and then popped in the oven to cook for half an hour before serving. It was also easy to make a veggie dish that didn't make our vegetarian guest feel like they were missing out on anything. We served this with a big mixed salad and a heap of wine. The winning component in this dish is the sauce. It's incredibly rich and decadent - definitely not something you'd eat very often - so it really felt like a treat and a special meal. I found myself scraping leftover sauce out of the dish the next morning in a hungover state, wishing there was more.

Ingredients:

Cannelloni pasta
1 big bag spinach
1 tub ricotta cheese
Breadcrumbs
3 chicken breasts
1 leek, cleaned and finely chopped
Two handfuls of mushrooms, finely chopped
1 tub cottage cheese

For the sauce:
2 onions, chopped
2 carrots, chopped
2 sticks of celery, chopped
2 bay leaves
1 bottle white wine
1.5 pints single cream
1 pint milk
About 1 tablespoon of Herbes de provence (dried)
Salt, pepper

Method:
- Prepare the veggie cannelloni first. In a food processor, whizz up all the spinach until it's very finely chopped. Chuck it in a bowl with the ricotta and add a couple of handfuls of breadcrums. Mix well, and stuff this mixture into the cannelloni. This takes a bit of time, so sit down at the kitchen table with a cup of tea and prepare to get your hands very messy. Place the filled cannelloni in a single layer in a baking dish and set aside.
- Now prepare the chicken version. Cook the chicken breasts on a pan in olive oil until they are done all the way through; this takes 10 or 15 mins. Once cooked, chuck the chicken into the food processor and blend until the chicken is in nice small pieces. Place this into a big bowl.
- Melt some butter in a pan and saute the mushroom and leek for 5 mins, just until the vegetables have softened. Add this into the chicken, throw in the cottage cheese and mix thoroughly.
- Stuff this mixture into cannelloni, and again place it on a single layer in a dish.
- Time to make the sauce, the sauce of which dreams are made. Heat some butter in a large saucepan and add the onions, carrots, celery and bay leaves. Saute for 10 minutes or so, until the vegetables are soft. Add in the whole bottle of white wine and simmer with the lid on for another 10 minutes, to get all the flavours of the vegetables into the wine.
- After 10 minutes, strain the wine through a sieve or colander to remove the vegetables and bay leaves - these can now be discarded as they have given all their flavour.
- Add the cream and milk to the wine and mix gently. Add approx 1 tablespoon of herbes de provence and a good dose of salt and pepper.
- The next step is to thicken the sauce. To do this, take a tablespoon of white flour and a tablespoon of butter. Put them in a bowl and mash them together with a fork to make a roux. Add this into the sauce and stir well; the sauce will begin to thicken as it simmers. Add more roux until the sauce is the thickness you want; ideally you want it thick enough that it will properly coat the pasta and not just drip off the sides.
- Pour the sauce over the cannelloni dishes so that all the pasta is covered.
- Cook in a moderate oven (160 or 170 degrees) for approximately 30 minutes, until the pasta is cooked and the top of the dish is beginning to brown. Serve immediately, to delighted friends.

Baileys coffee

My favourite after-dinner drink.


I don't drink coffee very often, but I do love a creamy boozey coffee after a special meal. These beauties are easy to make once you know what you're doing, and they look impressive when serving to guests.

Ingredients:
- Good quality coffee
- Baileys (even better, get the cheaper equivalent in Tesco or Aldi for 7 euro a bottle)
- Sugar
- Cream, whipped

Method:
- Brew the coffee; make it quite strong so that the flavour is able to come through the Baileys and the cream.
- Pour a generous shot of Baileys into each coffee glass, add 1 spoon of sugar and top up with coffee. Stir really well to make sure the sugar is dissolved.
- Pour some boiling water into a mug and get yourself a metal spoon, preferably a soup spoon if you have one. Dip the spoon into the hot water and then get a spoonful of whipped cream. Allow the cream to slide gently off the hot spoon on to the side of the coffee glass; this way the cream won't sink and you will have a perfect layer of cream at the top.
- Sprinkle with cocoa powder or coffee granules and serve.

Tiramisu

Creamy, moist and rich without being too heavy; the perfect dessert.


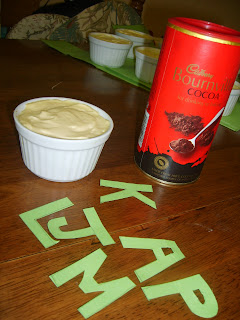
Martin and I served this as our dessert at our Come Dine With Me party. It is easy to make, and also simple to present in a beautiful way as you can make it in individual ramekins and keep everything neat very easily.I decorated the top of each dessert with the first letter of each guest's name to make it personalised. I think I just wanted an excuse to cut up bits of cardboard and play around with cocoa powder for a while; it was fun!

Ingredients (makes 8 small tiramisus):

- 1 packet of lady fingers, or some plain sponge if you can't get the fingers
- Coffee, the best you can lay your mitts on
- Dark rum/ brandy/ baileys
- 3 egg yolks
- 1.25 oz caster sugarr
- 1 or 2 teaspoons vanilla extract (don't use vanilla essence, it's awful)
- 250g marscapone cheese
- 250ml double cream, lightly whipped
- cocoa powder for decoration

Method:
- Make some strong coffee and spike it with booze - dark rum or brandy is good; I had neither so I put in a splash of baileys and it worked really well. Dip the sponge fingers into the coffee and put a layer of wet gooey sponge at the bottom of each ramekin.
- Using an electric mixer (if you don't have one this stage will take a long time), mix together the egg yolks and the caster sugar for at least 10 minutes. The mixture will begin quite thin and yellow but get paler and thicker until it is almost white and double its volume.
- Add in the vanilla extract, marscapone and double cream and mix well.
- Spoon half of this creamy mixture over the first layer of sponge fingers.
- Make another layer of sponge fingers dipped in coffee in each ramekin, and top with the remaining cream mixture.
- To personalise your desserts for a dinner party, cut out some letters from cardboard and lay them on top of your tiramisus. Using a sieve, sprinkle cocoa powder over the top of the tiramisu from a height, and remove the cardboard to reveal your pretty lettering on top of the dessert.


- Place the tiramisu in the fridge to chill, preferably overnight. I served with baileys coffees.

Leek and potato soup

A comforting bowl of hot spiced veggies to hug you warm in the winter


Ingredients:
- 2 onions, chopped
- 2 cloves garlic, minced
- 3 leeks
- 2 potatoes, peeled and diced
- 2 litres chicken stock
- 1 heaped teaspoon paprika
- 1 tablespoon flour

Method:
- Heat a knob of butter and a glug of olive oil in a large saucepan on a low-medium heat. Add the onions and garlic and allow them to sweat for 5 mins or so until soft and translucent.
- Add the flour to the onions and stir well. Cook on a low heat, stirring regularly for 1 - 2 mins to make sure the flour is cooked through.
- Add a splash of the hot chicken stock to the pan and stir well. Keep adding small quantities of stock and stirring until the mixture is thin and loose - then chuck the rest of the stock in all in one go.
- Cut down the centre of the leeks lengthways and wash the leeks thoroughly under the tap, fanning out the layers to make sure you get rid of any grit inside the leeks. Chop the leeks and add to the pot.
- Add in the paprika (you can use either sweet or spicy paprika; both will give the soup a lovely warm colour but the latter will make it hot, if you're into that sort of thing), and add the diced potatoes too.
- Simmer with the lid on for approx 20 minutes until the potatoes are tender. Serve with thick buttered slices of homemade brown bread.

Courgette & parmesan fritters

A fancy take on my old friend the courgette


Some friends of mine and I are partaking in a 'Come Dine With Me' style cooking challenge, in which each couple take turns in hosting a dinner party and then the guests give anonymous scores out of 10 for the evening. Myself and Martin went first, and this was our chosen starter for the evening. We served the fritters hot with cold couscous salad on the side.

Ingredients (serves 4):
- 1 large courgette
- 2 tablespoons freshly grated Parmesan cheese
- 2 or 3 slices of bread, whizzed up into breadcrumbs
- 1 clove garlic, minced or crushed
- 1 egg, beaten


Method:
- Grate the courgette onto a clean tea towel, then gather up the sides and squeeze the courgette to release the excess water. Once this is done, put the courgette in a bowl and mix in the parmesan, garlic and breadcrumbs.
- Grab a handful of the mixture and work it with your hands to test the consistency. It needs to be wet enough for you to be able to mould it into patties without falling apart, yet dry enough so that it doesn't stick to your hands in a globby mess. If your mixture is too dry at this stage and won't hold together, add a little of the beaten egg to help it bind. If too wet, add more breadcrumbs.
- Form the mixture into about 8 patties and fry them over a medium-low heat in some olive oil for approximately 4 minutes on each side, until golden.


- For the couscous, cook it according to the instructions on the packet. Saute some shallots or finely diced onion slowly in some butter until soft and translucent. Add this to the cooked couscous, with some chopped flat leaf parsley, salt and black pepper. Using a dry frying pan, toast some pine nuts quickly until they start to brown and mix them into the couscous too.


My co-chef plating up the couscous:

Monday 12 October 2009

Ginger and cinnamon cookies

Chewy and sweet, these spiced biscuits are little comforting gems.


I spotted a recipe for these cookies on a blog called Gimme Some Oven earlier this week, and immediately knew I had to try it out. These are very different to the type of biscuits we generally get in Europe, as they are not crunchy but instead are incredibly sticky and chewy.

I have adapted the original recipe for a couple of reasons. Firstly, their recipe makes (and I am approximating here) about seven billion kajillion cookies. I have halved this recipe, and yet still you will get a yield of about 50 - 60 cookies. I also changed the recipe as I couldn't get a hold of molasses and discovered that black treacle (my first idea for a substitute) is absolutely and positively vile. I had never tasted it before, and it turned out to be like sticky sludgy out-of-date cough medicine. My old friend golden syrup turned out to be the perfect substitute.


Ingredients:

6oz butter, softened
7oz caster sugar
1 generous tablespoon golden syrup
1 egg
10oz flour
2 tsp bread soda
2 tsp cinnamon
2 tsp ginger
2 tsp ground cloves
1 tsp salt

Method:

Pre-heat the oven to 160 degrees (this is for a fan oven - if using a conventional oven, try 180). Line two baking trays with greaseproof paper and set aside.

Cream together the butter and sugar with an electric mixer for about 5 minutes until it becomes paler in colour and thick in consistency. Add in the egg and beat well until combined.

In a separate bowl, mix together the flour, bread soda, salt and spices in a bowl. Make a well in the centre and add in the butter, sugar and egg mixture. I tried combining all the ingredients using a wooden spoon but really the only way to do it properly is to stick your hands in and get messy. Press the goo through your fingers to mix it really thoroughly; this is ridiculously good fun and kids would love to help at this stage. Once all the ingredients are fully combined, you will have a thick moist dough to work with which will emit the most wonderful of smells.

Get a shallow bowl and chuck in a couple of tablespoons of caster sugar. Add in a pinch of ginger and of cinnamon and mix.

Using wet hands, grab a small piece of dough and roll it in your hands to form a ball. Each ball should be approx 1 inch in diameter. Roll the ball in the sugar to coat it, and pop it on the lined baking tray. Repeat. Leave plenty of space in between each cookie, as they will flatten and expand in the oven - a gap of 3 inches or so should do the trick. If your cookies are joining together when they bake, widen the gaps between them and they will stay separated.

I baked these in the oven for 5 minutes and they were perfect. The timing will depend on your oven, but try a test batch and see if 5 minutes is long enough for your cookies. I knew mine were done as the edges were turning brown and any more heat would have burned them. Bake these in batches and cool them on a wire rack. Be careful removing them from the baking trays as they will not be hard when they come out of the oven; rather they are quite fragile and a bit sticky. They will harden once they cool - which they do rather quickly as they are so thin.

Store in an airtight container and serve with a lovely big cup of tea and a grin.

Saturday 19 September 2009

Banana bread

Moist and sweet, a slice of this is a great accompaniment to a cup of tea.


Ingredients:

8 oz self-raising flour
8 oz caster sugar
3.5 oz soft margarine
3 eggs
16 oz bananas (slightly old ones are best, that have black speckles on the skin)
1 tsp cinnamon (optional)

Method:

Sieve the flour into a bowl and add the sugar. Mix in the margerine and add the eggs one at a time. Mix until the ingredients are just combined - you should have a very thick heavy batter.

Mash the bananas (16oz is around 6 bananas) until properly mushy and as smooth as you can manage and stir in the cinnamon. Add the bananas to the batter and stir in.

Pour the mixture into a greased loaf tin. Put into the oven at 160 degress (fan oven) for approximately 20 minutes until the top of the bread has risen and turned golden brown. Cover with tin foil and return to the oven for another 40 - 50 minutes until a skewer comes out clean.

Turn out to cool on a wire rack and serve in lovely thick slices with afternoon tea. This will keep well for 3 - 4 days in an airtight container.

Wednesday 19 August 2009

Chilli Lime Scallops

Bitesize pieces of meaty fishy heaven.


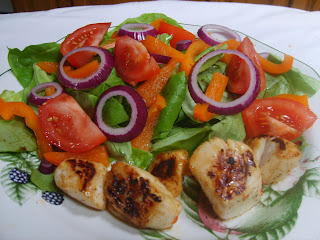
A really excellent fish shop, Kish Fish, opened up in Coolock recently and I have been eager to get my mitts on some scallops for the past week. I finally made it over today and had these bad boys for my lunch. They cook in less than 5 minutes, and here I've just served them with a simple salad.

Ingredients (serves 1):

4 - 5 fresh scallops
Salt, pepper
Fresh chilli, finely chopped
Lime juice

For the salad:
Butterhead lettuce, washed and torn
Tomato, cut into wedges
Bell pepper, sliced
Red onion, sliced
Splash of balsamic vinegar

Method:

First thing to do is to remove the orange part of the scallop with a sharp knife (you can ask the fishmonger to do this for you if you prefer). Season the scallops with a touch of salt and pepper, and put them into a small plastic bag. Add a generous dollop of lime juice and as much or as little chilli as you would like. Seal the bag and shake the ingredients around to ensure that each scallop is coated. Put this aside and let it marinade while you prepare the salad.


Chuck together your salad on a big plate, and drizzle with a little balsamic vinegar.

Put a frying pan on the stove on a high heat with a touch of olive oil. When the pan is good and hot, in go the scallops. Cook for 2 minutes on each side and serve immediately with the salad. This makes a good hearty lunch, or you can downsize the dish and serve as a starter for dinner.

Friday 7 August 2009

Cinnamon banana porridge

Creamy spiced oats to make your belly sing


Porridge is easily the healthiest breakfast a body can have, but it took me a while to make peace with it's gloopy texture and grey pallor. This recipe turns sludgy old porridge oats into a warm and flavoursome breakfast that will keep you full and content for ages. It's also incredibly cheap and quick to prepare.

Ingredients: (serves 2)

2 oz porridge oats
Just a little over 1/4 pint water
1/4 pint milk
1 teaspoon ground cinnamon
1 large / 2 small bananas, chopped

Method:

I always make this in the microwave, as it is easy and fast and less difficult to clean up afterwards, but you can make it in a saucepan over a medium heat too.

For the microwave option, get a pudding bowl which is nice and deep. Put in the cinnamon and oats and shake them together. Add the milk and water, stir, and put in the microwave on full power for 45 seconds. Stir well and turn it on again for 45 seconds. Repeat, then put back in the microwave until you can see the oats bubbling up to the top of the bowl.

Spoon into bowls and add the chopped banana. Serve immediately, and happily.

Monday 27 July 2009

Sweet potato and chickpea curry

A fiery, easy-to-cook treat for a naughty Monday hangover.


I have had a hankering for a good curry for a while now, so threw this together in a very haphazard fashion this evening and was delighted with the results. It takes about an hour to make as I cooked it pretty slowly but it's worth it. You can serve this with a traditional side of rice, but actually it's very filling as a single dish in itself as it's chock full of potato and beans.

Ingredients (serves about 2):

1 onion, finely chopped
Approx 3 heaped teaspoons garam masala
1 heaped teaspoon cumin
Approx 1 teaspoon fresh red chilli
1 teaspoon mustard seeds
2 cloves garlic, minced
1/2 sweet potato, cubed
1/2 courgette, sliced
1 tin chickpeas
1 carton passata or a tin of chopped tomatoes
1 teaspoon sugar
Handful of sunflower/ pumpkin seeds
Salt & pepper
Natural yogurt (optional)

Method:

Heat some olive oil in a saucepan over a medium heat. Add the mustard seeds when the oil is hot. When they start to pop a little, add the onion, garam masala, cumin, and garlic. Stir well and season lightly with some salt and pepper. Cook the onion and the spices for 2 - 3 mins, stirring to prevent burning.

Add the chopped sweet potato and courgette and turn the heat down to medium-low. Cover and cook for 5 mins.

Add in the sunflower seeds and the passata. I prefer to use passata to a tin of tomatoes for the thicker texture it yields and the deeper flavour it provides, but use whatever is knocking about in your kitchen. Add the sugar (it cancels out any bitterness in the tomatoes) and season again with salt and pepper. Add 1 or 2 chillis depending on your preference - keep the seeds in if you want it super hot and spicy.

Cook this uncovered on a low heat for approximately 1 hour. Give it a stir every once in a while to make sure it isn't sticking to the bottom; if it sticks, add a little water to loosen the mixture. Taste well and season again before serving if needs be.

Mine turned out sweat-inducingly spicy as I am somewhat of a novice at cooking with fresh chilli. To take the edge off, I served the curry with a big dollop of natural yogurt and it was delicious.

Thursday 23 July 2009

Vanilla bean cheesecake with a mixed berry coulis

Warning: This makes battered Mars Bars look like salad.


My older brother Derek lives in England and is home this week for a rare but delightful visit. To celebrate, we all milled down to my sister's house in Wicklow and got pissed as farts and played board games. I figured we would need something suitably impressive and indulgent to bring to the party. Derek used to be the pastry chef in a prestigious local restaurant and managed to vaguely recall their recipe for their famed cheesecake. We very successfully recreated it in our kitchen, complete with hangovers and tea. Bear in mind that the measurements are approximated, but it's hard to go wrong with this recipe. Keep tasting as you go and you'll be grand.

This is the Derek!


Ingredients:

For the base:
1 packet Digestive biscuits
4 oz butter, melted

For the topping:
500g philadelphia cheese
250ml double cream
3 tablespoons caster sugar (approx)
1 vanilla pod
Juice of 1/2 a lemon

For the coulis:
Mixed berries
Granulated sugar

Method:

Make the base first by crushing the Digestive biscuits into crumbs. Combine this with the melted butter and mix well to ensure all of the biscuits are coated in the liquid. Chuck this mixture into the base of a cheesecake tin and press it down well with the back of a spoon to make sure it is properly compacted and will set. Pop this in the fridge whilst you get on with making the filling.

Using an electric mixer, whisk up the double cream until really thick (but before it becomes butter). Add the cream cheese and mix well.

Slice the vanilla pod open lengthways and use the flat part of your knife to remove all the delicious innards, which look like tiny black particles. You can substitute vanilla extract if you don't have pods, but I wouldn't use vanilla essence as it's really rubbish. (Side note: Vanilla pods are famously expensive, but needn't break the bank. I buy mine from a website called Vanilla Mart where you can get a good load of pods for about 5 British pounds. Vanilla extract is also available in Tescos for about 6 euros a bottle.) Throw this into the mix. Add in approx 3 tablespoons of caster sugar and the juice of 1/2 lemon and mix well. Taste the mixture at this point and add more sugar and/or lemon if needed. Try to avoid eating the entire bowl of goo at this stage, which is ridiculously hard to do.

Spoon the filling over the chilled biscuit base and smooth it with a spatula. It should be thick and creamy and flecked with lovely black spots of vanilla. Mine looked something like this in the tin:


This is a very heavy, thick cheesecake so you can leave it to set for anywhere between 1 hour and 1 day before serving. The taste is of a very rich, decadent dessert and it can be enlivened by serving with a simple coulis. To make this, get some mixed berries (I get lovely bags of mixed frozen fruit in Aldi for about 2 euro a go - if you can't get this, just get some fresh fruit from your local supplier). If using frozen berries like me, put them in a bowl and let them defrost slowly overnight. Put them in a saucepan with smattering of sugar and cook them on a low low heat for about 20 minutes. Beware not to leave a wooden spoon in the mix as they cook, as mine is now permanently stained purple from the juices.


When the berries have released all their juices and the liquid has thickened slightly, turn off the heat and allow to cool. Don't reduce the liquid too much as it will continue to thicken as it cools.

Serve slices of the cheesecake with a generous splash of coulis on the side, preferably with a nice Pinot Grigio or a can of the finest, cheapest beer you have to hand.

Monday 29 June 2009

Vegetable Gratin

Tasty, healthy, quick and wallet-friendly.


I put this dish together after reading a few different recipes for different types of gratins. Oh, I love a conventional gratin, but not the calorific cream that comes with it. This is a healthy take on a version of a vegetable gratin that I found in an old recipe book. I put in some bitesize pieces of chicken (just because I had it to hand) but actually it would be better without, so I've omitted it from the recipe. This will serve 2 people as a side dish or 1 person as a complete dinner.

Ingredients:

1 courgette, sliced
2 tomatoes, sliced
A handful of broccoli florets
2 cloves of garlic, finely chopped
10 basil leaves, shredded
Parmesan cheese
2 tablespoons olive oil
Salt, pepper

Method:
Chuck the vegetables in a bowl with the basil and pour over the olive oil. Season well with salt and pepper and mix everything together with your hands to ensure everything is coated with the oil and seasonings.

Transfer the mixture to a baking dish and grate some Parmesan cheese over the top.

Bake in the oven for 15 - 20 minutes until the vegetables are cooked and the cheese has gone golden brown. Serve immediately.

Sunday 28 June 2009

Minted chickpea salad

Nothing says 'summer' like the fresh taste of mint and lemon


I went shopping for a dress this morning, something I generally find a bit stressful and exhausting. I am not a born shopper. When I got home I was starving and craved something that was not only quick but also full of goodness to perk me back up again. I knew we had mint in the garden and feta in the fridge, so this all came together in a matter of minutes. This is a fresh salad with a bite, and is fairly filling because of the chickpeas.

Ingredients (serves 3 - 4):

1 tin of cooked chickpeas, drained and rinsed
3 or 4 scallions, chopped (I would usually use red onion, but didn't have any to hand today)
A block of good feta - it should be crumbley and salty - cut into chunky dice
2 big tomatoes, deseeded and chopped (or some cherry tomatoes)
Approx 10 mint leaves, finely chopped
Juice of 1/2 lemon

Method:

Mix together all the ingredients in a bowl, and make sure everything is coated in the lemon juice. It is ready to serve. It works on its own as a lovely lunch on a summer day, or as a side dish with barbeques or dinner parties. Sweet.

Saturday 27 June 2009

Hearty brown bread

Looking for something seedy?


This bread has been made in my house since as far back as I can remember. It's hearty, healthy and versatile. The recipe is completely yeast-free, sugar-free and salt-free, and packed with wholemeal flour and seeds to make it fibre and grain rich. This will keep for a good few days, and tastes great toasted when it's nearing its departure date.

Ingredients:

12 oz brown flour
4 oz white flour
2 oz pinhead oats
2 oz wheatgerm
2 oz bran
2 tsp bread soda
1 handful sunflower seeds
1 handful pumpkin seeds (and any other seeds you have about the place)
Approx 1 pint buttermilk

Method:

Grease a loaf tin lightly, and pre-heat the oven to 190 degrees.

In a large bowl, combine all the dry ingredients. Add the buttermilk and stir. The consistency you want is that of a thick batter, and I often find I need to splash in another bit of buttermilk to get it just right.

Transfer the mixture into the loaf tin and bake in the oven for 50 mins. To check if the bread is cooked, remove it from the tin and turn it upside down. Tap on the underside of the bread; if it sounds hollow, then it's cooked. If not, put it back in the loaf tin upside down and return to the oven for another 2 minutes or so.

When it's cooked, wrap it in a clean damp teatowel. The dampness stops the bread crust from becoming hard. It can be eaten as soon as it has cooled; I suggest trying it with lots of blackberry jam or slices of lightly salted tomatoes.

Friday 26 June 2009

Crepes Suzette

The fancy name for "Pancakes in Orange Sauce"


This is a yummy dessert that I typically have just once a year, on Pancake Tuesday. My father is the master of this dish, and made it for me earlier this week as a treat. The sauce is rich and shiny and sweet and buttery and zingy all at once.

Ingredients:

For the pancakes:
3.5 oz flour
2 eggs
Pinch salt
200ml milk mixed with 75ml water (approx)

For the sauce:
2 oz butter
2 oz sugar
About 100 ml good quality orange juice (with bits in is even better)

Method:

For the pancakes, sieve the flour into a bowl and mix in the salt. Whisk in the eggs and gradually add in the milk/water mixture until you have the consistency you desire. I like my pancakes a little thicker than usual, so I tend not to mix in all of the liquid. Add as little or as much as you like really. For thin crepes, the mixture should be just slightly thicker than milk in consistency.

Cook the pancakes one at a time on a medium-hot frying pan, greased with a little oil or butter. Once cooked, fold each one in quarters and set aside.

The sauce ingredients as listed above as fairly approximate, as my father and I never work from a recipe for this dish but just go by eye and by taste. Taste the sauce as you go and add a little more sugar if its not sweet enough, or a little more butter if not rich enough.

To make the sauce, sprinkle the sugar over the bottom of a dry, large-bottomed shallow saucepan on a low heat. Allow the sugar to melt entirely and then add the butter. Mix together and the mixture will gain colour as the sugar caramelises.

Heat the orange juice gently in the microwave and add it to the sauce. Don't panic if some of the sugar crytallises into hard bits - these will melt as the sauce cooks. Once all the sugar is dissolved, let the tasting commence. For a zingier sauce, add the zest of an orange or even some Grand Marnier if your wallets can stretch to it.

Place some of the pancakes into the sauce, and have fun creating shapes like this:


Turn the pancakes a few times in the sauce and simmer for 2 or 3 minutes, until the pancakes are hot and hopelessly drowning in orange sauce. Serve immediately, and with gusto.

Mozzerella & Basil Puffs

Hehe... puffs.

I rarely bake with puff pastry due to the butter content, but I had some in the fridge this week and wasn't sure what to do with it. A root around the fridge revealed a healthy lump of mozzerella, and I always have a rake of fresh basil on hand thanks to my ever-generous indoor plant. These came together beautifully. We ate these puffs as pre-dinner nibbles with a glass of chilled pink wine and they were absolutely delectable. Apologies that I don't have any photos of the puffs in their cut-up, individual and final form, but my camera died and the smell wafting from this dish made me too hungry to search for batteries.

Ingredients:

1 sheet of ready-made puff pastry, defrosted and ready to go
Handful flour
1 egg
1 lump mozzerella, sliced
About 10 - 12 basil leaves
Parmesan cheese

Method:

Pre-heat the oven to 180 degrees celcius (that's fan temperature, so increase if using a conventional oven).

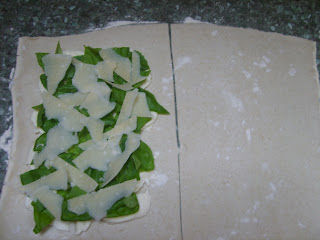
Lightly flour a countertop and open up the pastry. Roll it out a bit so it's slightly thinner than as packaged, and cut it in two like this:


On one side of the pastry, place a layer of the sliced mozzerella, leaving a border of about 1 inch all the way around the edge. Tear up the basil leaves and layer on top. Finally, shave some parmesan (I use a vegetable peeler for parmesan cheese, much easier than grating it) on top. It should look something like this:


Beat the egg in a cup with a splash of water. Brush egg all around the border of the pastry and place the second half of the pastry on top of the cheese and basil. Seal the edges by pressing down with a fork, and brush the entire top of the pastry with eggwash. Make three slits in the top with a knife to allow any steam to escape during cooking.


Put this in the oven for about 15 - 20 minutes until puffed and golden and smelling like a party.


Leave to cool slightly, then cut into slices and serve.